Writing new data
In this section we'll make an API client app and write some Python scripts to send data to Exist for our attributes. Along the way we'll learn about OAuth2 clients and the authorisation process, authenticating ourselves, creating and acquiring attributes, and the main ways of interacting with the Exist API to write data. This should build a good foundation for you to use the Exist API to manage the data for an attribute, perhaps as a way of sending data on triggers from other events, or as a regular automated syncing process from another data source.
Our code examples will be in Python, and you're encouraged to copy and paste them, save them, and run them yourself! I'm using Python 3.8, but Python 3.6 or newer should be fine. You'll need to make sure you have the requests library installed.
You're not required to have read the read client section, but here we'll only be dealing with writing data, so you may want to consult that section first in order to understand the structure of the data Exist provides.
Creating a client
To be able to write data, we first need a way to interact with the API on behalf of users. For a start, that'll just be ourselves, but we may want act on behalf of many different users. Let's say we were the owners of a service called Greatreads, which tracks book-reading, and we wanted to allow our Greatreads users to connect their account to Exist and update the pages_read attribute based on what they'd entered in our app. In the same way that connecting a service like Fitbit to Exist requires logging in to Fitbit and approving Exist to read our data, we'd need a way to represent ourselves as the service "Greatreads" to Exist users, allowing them to give us permission to access their Exist account and write data to it. A client app is the answer, so let's make one.
On your account page in Exist you'll see Developer apps in the sidebar menu. Let's open this page. If you haven't made a client app before, you'll see an empty list, but once you have your own apps, they'll be listed here. Let's choose to "Add a new client" where we'll see the form for creating a new client app.
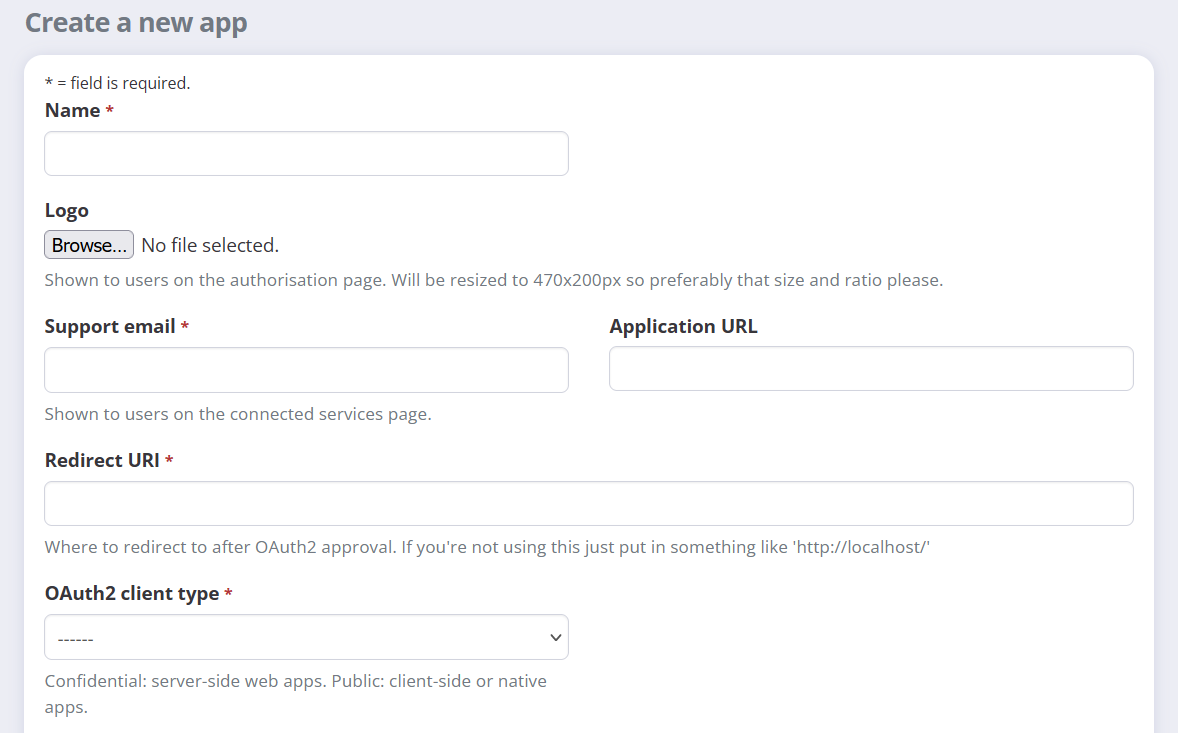
Go ahead and fill in the details for your app. We won't be sharing this with anyone else right now, so the public details don't really matter. Name it whatever you like. The important details to enter are http://localhost:8000/ for our Redirect URI, and "Confidential" for our client type. Submit the form and view the details for your first client app!
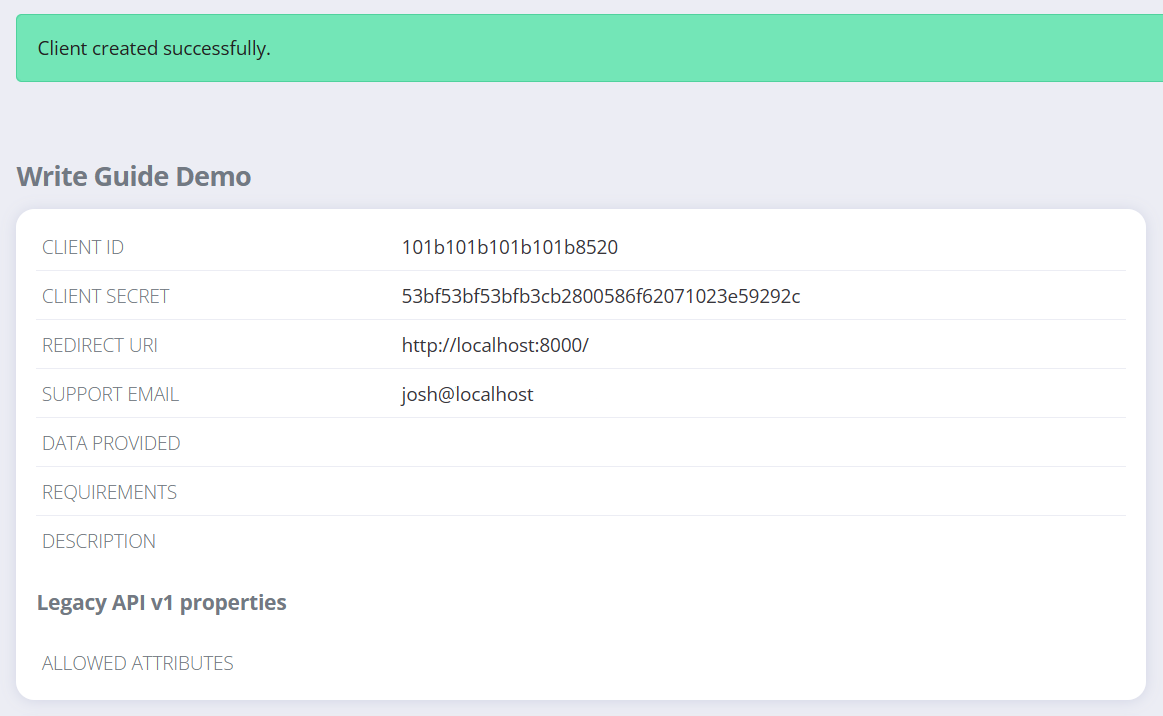
The client ID and secret are important values that we'll be using in our code. You'll also see a token has been created for us:
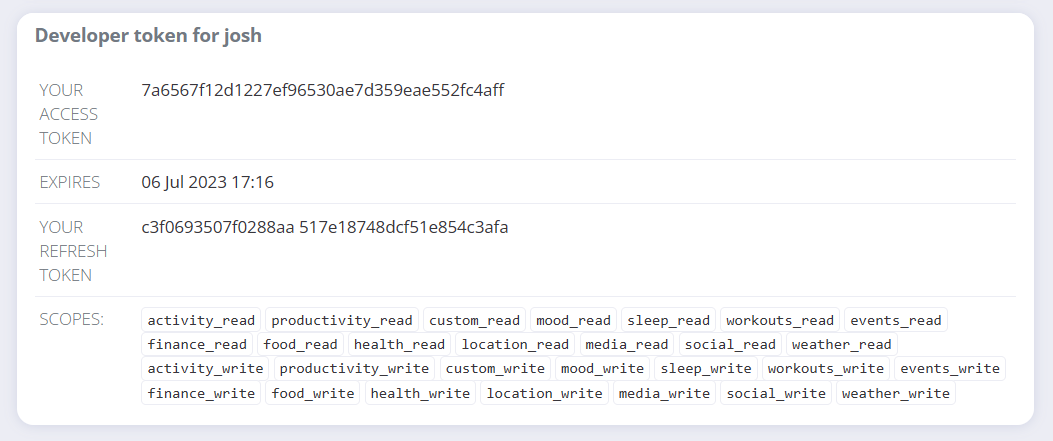
A user access token is a way of authenticating ourselves to Exist on behalf of a particular user. In this case, Exist has created us a personal user token to get started with, with permissions to read and write all attributes, so that we don't need to go through the OAuth2 authorisation flow before getting our own data. Let's not worry about this, because we want to go ahead and learn the full OAuth2 flow.
Authenticating a user with OAuth2
Users give client apps access to their accounts by completing the OAuth2 authorisation flow. For clients, this involves sending the user to a URL on the Exist site filled with some relevant client details, receiving a code that signals user assent, and exchanging this code for a long-lived user token. For users, this involves making sure they're logged in to Exist, following this URL, and then approving the permissions the client has asked for by clicking "allow". At the end, users can use the client to read and/or write the attributes it has access to, and clients can perform these read/write operations on users' behalf.
Choosing scopes
A scope represents a certain permission or area of access to data. In the case of Exist, we have read scopes and write scopes that correspond to the groups attributes live in. For example, if we ask Exist for the activity_read scope, we're asking for the ability to read attribute, correlation, average, and insight data related to any attribute the user has in the Activity group. If we asked for the activity_write scope, we wouldn't be able to read any of this data, but we could create, own, and write new values for any attribute the user has in Activity.
Scopes are broken down in this way so that clients can ask only for the access they need, and users can be safe in the knowledge that clients aren't reading or writing any other attributes. So a responsible client should ask only for the scopes it really needs in order to function correctly. For example, for Greatreads, we'd ask solely for the media_write scope so we can acquire and write to the pages_read attribute, and maybe later create our own attributes in the Media group. The list of requested scopes is presented on the authorisation page for the user to agree to, so the user would see these permissions listed:
- Read your profile details (not including email address)
- Write Media group: Create new attributes and write data to attributes in the group
All clients can see a user's profile details without asking for this scope specifically, so that they can address the user and present user data in the correct units and so on. So these are the two permissions the user agrees to.
You can find a full list of scopes in the OAuth2 reference.
The authorisation flow
Okay, now we start getting into some code. Let's go over the list of steps required to authorise ourselves with a user:
- We send the user to the "request authorisation" page at
/oauth2/authorizeon the Exist site - The user reviews the permissions and clicks "Allow", which redirects them back to a URL we specify
- We take the code we received in step 2 and exchange it for a user token by making a call to
/oauth2/access_token
That's it! So for the first step, what we need is the ability to create the correct URL to give the user. We know the page, but we need to include a lot of parameters:
response_type=codeto request an auth code in returnredirect_uriwith the URL to which Exist returns the userscopewith the list of scopes we're asking forclient_idwhich is our OAuth2 client ID
Let's keep going with our Greatreads example and ask for the media_write scope only. Remember that when we created our client app, we set our redirect URI to http://localhost:8000/, so we'll need that same value here.
Why did we choose this URL to redirect to? The browser needs to redirect us to a site that we have access to, and localhost is shorthand for "this computer I'm on right now". It's most simple to host that site on our own computer temporarily, because we can just run the script in our terminal to do that. (The final part of this URL, :8000, means use this specific port number — don't worry too much about that.)
from urllib.parse import urlencode

CLIENT_ID = "[your_id]"
URL = 'https://exist.io/oauth2/authorize'
REDIRECT_URI = 'http://localhost:8000/'

# the parameters we'll be sending
params = {'client_id': CLIENT_ID,
          'response_type':'code',
          'redirect_uri':REDIRECT_URI,
          'scope':'media_write',
         }

# let's encode them appropriately for a URL
querystring = urlencode(params)
# and finally print the complete result to the terminal
print(f"{URL}?{querystring}")
Copy this, save it to request_authorisation.py, and add your own client ID to CLIENT_ID. Run it with python3 request_authorisation.py and you'll see the URL in your terminal (something like, but not the same as, this example):
https://exist.io/oauth2/authorize?client_id=1234abcdef&response_type=code&redirect_uri=http%3A%2F%2Flocalhost%3A8000%2F&scope=media_write
This is the URL we'd give to any user who wanted to connect our Greatreads app to their Exist account. If we follow this URL in our own browser (if you can't click it, copy and paste it in), we'll be presented with the authorisation page:
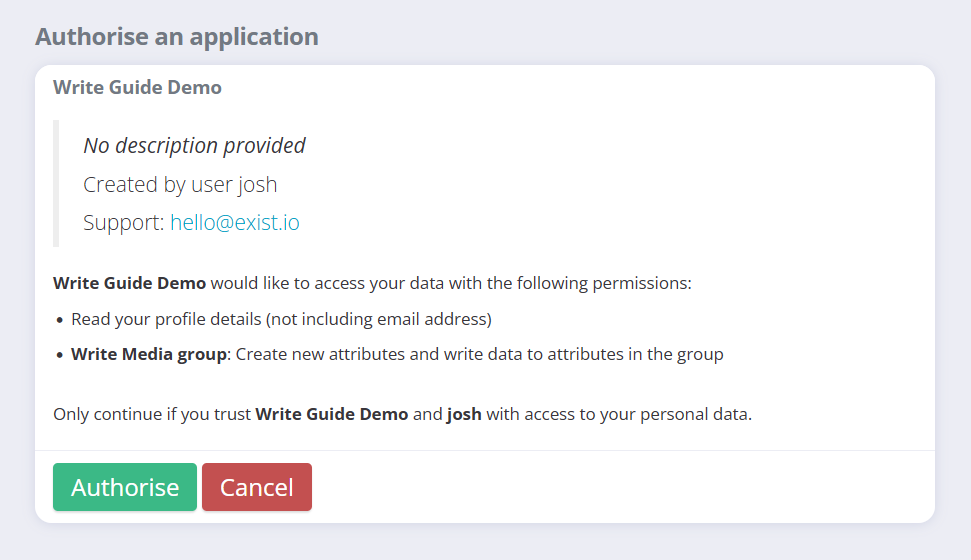
Keep this tab open but don't click "Allow" yet! Remember that Exist wants to send a request back to us at http://localhost:8000/, and we need to be listening on this port to receive it. That's what we'll write next.
from http.server import HTTPServer, BaseHTTPRequestHandler
from urllib.parse import urlparse, parse_qs
import requests

CLIENT_ID = ''
CLIENT_SECRET = ''
REDIRECT_URI = 'http://localhost:8000/'

# create a class to handle our http request
class Handler(BaseHTTPRequestHandler):
    def do_GET(self):
        # parse the path of this request into its parts
        parts = urlparse(self.path)
        # then parse the query parameters into a dict
        query = parse_qs(parts.query)
        # and then get the code we need out of the dict
        code = query['code'][0]

        # tell the browser it worked
        self.send_response(200)
        self.wfile.write(b'OK!\n')
        # then get our access token
        self.get_token(code)

    def get_token(self, code):
        # make our request using our new code, and some other client details
        response = requests.post('https://exist.io/oauth2/access_token', {
            'grant_type':'authorization_code',
            'code': code,
            'client_id': CLIENT_ID,
            'client_secret': CLIENT_SECRET,
            'redirect_uri': REDIRECT_URI,
        })
        # parse the response into json
        data = response.json()
        print('Access token: ', data['access_token'])
        print('Refresh token:', data['refresh_token'])


# create a http server and listen for one request only
server_address = ('127.0.0.1', 8000)
httpd = HTTPServer(server_address, Handler)
httpd.handle_request()
httpd.server_close()
Save this as receive_authorisation.py, making sure you add your own values for the client ID and secret. Then run it with python3 receive_authorisation.py, which will start listening for HTTP requests on port 8000 on our local machine. Remember, this is where we told Exist to send the user when we defined our redirect_uri.
Listening for requests means we're ready to go, so hit "Authorise" in the browser. Your browser gets redirected to http://localhost:8000/?code=[code], and our python script receives this request from the browser, grabs that code, and sends it to Exist to exchange for an access token.
So if all goes well, you'll see "OK!" in the browser, and your tokens in the terminal (something like this, with different strings):
Access token:  8f65bce0f9fdde00b88c7cf25f29b06be43f6ee5
Refresh token: 8c7cf25f29b06be43f6ee58f65bce0f9fdde00b8
We've done it. We sent the user to the authorisation page on Exist, received the request containing the code, and exchanged the code for a token. Now, if we deployed our program to a publicly accessible server (that is, not localhost), we could use the same process to successfully authenticate any user, storing their tokens somewhere for use later in our client app.
Although you can't see it in the incomprehensible hash of the token, access tokens are tied to the users they authenticate. So when we send one to Exist, it's able to look up the token and know which user we're acting on behalf of — sending this token is enough, and we don't have to specify anything extra like a username.
Using a token in requests
Now we have an access token, what do we do with it? The token authenticates requests we make, so we need to include it in every request. We do this by adding the Authorization header to the request, with a value of Bearer [token]. It looks like this:
import requests

TOKEN = '[your_token]'

requests.get("https://exist.io/api/2/accounts/profile/",
    # the relevant addition
    headers={'Authorization':f'Bearer {TOKEN}'})
You'll see this again in all of our code examples past this point.
Refreshing a token
OAuth2 tokens can expire, and those issued by Exist expire after a year (we can confirm this by checking the expires_in field). If we try to make a request with an expired token, we'll get a HTTP 401 response containing an error message, meaning we're not authenticated properly. What to do then? Well, we could ask the user to authorise our client app all over again, which would allow us to create a new token. Or, to save the user being involved, we could exchange our refresh token from the previous step for a new access token. Each time we do this, we get a new refresh token too, so we can keep repeating the process every year as required. Tokens don't need to be expired in order to be refreshed, so you can do it early if you need to.
Refreshing a token looks a lot like our get_token call from receive_authorisation.py above, but instead of sending a code, we send the refresh token:
import requests

CLIENT_ID = ''
CLIENT_SECRET = ''

def get_token(refresh_token):
    # make our request using a different grant type and our refresh token
    response = requests.post('https://exist.io/oauth2/access_token', {
        'grant_type':'refresh_token',
        'refresh_token': refresh_token,
        'client_id': CLIENT_ID,
        'client_secret': CLIENT_SECRET,
    })
    # parse the response into json
    data = response.json()
    print("\nNEW TOKENS")
    print('Access token: ', data['access_token'])
    print('Refresh token:', data['refresh_token'])


refresh_token = input("Refresh token: ")
get_token(refresh_token)
Save this as refresh_token.py, add your client ID and secret, and run this with python3 refresh_token.py. Enter the refresh token you received from the previous step, and you should see the same kind of output:
NEW TOKENS
Access token:  db2641b07f916358a5df6eb50a88ca09da306283
Refresh token: f58f65bce0f9fdde00b825f29b06be43f6ee8c7c
Now in our client app, we'd store these two new tokens and use the access token to authenticate requests as before, saving the refresh token to use in this process when our access token expires.
Now that we have access tokens with media_write scope, we can move on to actually writing data!
Acquiring attributes
The first step in being able to write data for an attribute is to acquire it. An attribute can only be owned by one service at any one time, and only the owning service is allowed to write data for it, so if we want to write to it we need to be the owner. To write data for pages_read, we'll need to first acquire this attribute by making a POST call to https://exist.io/api/2/attributes/acquire/.
import requests, json

TOKEN = '[your_token]'

def acquire_attribute(token, attribute):
    # make the json string to send to Exist
    body = json.dumps([{'template': attribute, 'manual': False}])

    # make the POST request, sending the json as the POST body
    # we need a content-type header so Exist knows it's json
    response = requests.post("https://exist.io/api/2/attributes/acquire/",
        data=body,
        headers={'Authorization':f'Bearer {token}',
                 'Content-type':'application/json'})

    if response.status_code == 200:
        # a 200 status code indicates a successful outcome
        print("Acquired successfully.")
    else:
        # print the error if something went wrong
        data = response.json()
        print("Error:", data)

# call the function with the attribute we're after
acquire_attribute(TOKEN, "pages_read")
For most API endpoints, we'll be sending and receiving JSON. To acquire attributes, we send a JSON body with an array of objects, each one with a key of either name or template and the value being the attribute name. Like this:
Here we're only asking for ownership of one attribute, but if we were after multiple, we could acquire them all with a single call to the API, by adding to that array. We're sending the manual flag too, to make sure that when we acquire the attribute, it is not shown for manual entry in the Exist clients. We don't want users to overwrite the data we're providing by entering it manually.
Save this script as acquire_attribute.py, add a valid access token, and run it with python3 acquire_attribute.py. If all goes to plan, you'll see this succinct output:
We could run this again and get the same result, which is handy if we're not sure if we own it, but it's worth remembering that we don't need to acquire attributes every time we want to write to them, rather, just the first time the user connects our app. It makes sense to assume they're ours from that point, and then later if we get an error that we're not the owner while trying to write data, we can acquire them again and retry our update.
Using attribute templates
Remember how we could use either template or name as the key in our JSON object, and we chose to use template? Let's look at the flow of acquiring and when to use one or the other, because the rules here are tricky.
With our Greatreads example, we'd like to provide pages_read data. Exist has a template for pages_read, meaning it understands this attribute is for tracking a quantity of pages read, knows it's an integer type, and can provide more detailed insights about it because of this. It's preferable to use attribute templates when we can because this gives the user the best experience in getting analysis of their data. User attributes can be templated, like "steps", "mood", and so on, or they can be "custom", just like custom tags, where Exist only knows the type of raw data they hold. Users can create custom attributes for tracking manually in the Exist apps, or a client app might create one for a user in order to track something it knows about.
Using a template sounds right for us, so we want to acquire the templated attribute pages_read, meaning we would use the template key. In this case, if the user doesn't have this attribute, Exist will create it for the user automatically and give its ownership to us. So convenient! Thank you to whoever created this API 🙏
But imagine that we had erroneously used the name key, for example {"name": "pages_read"}, and the user had instead already created a manual attribute they've called pages_read which is a percentage type, for tracking that they finish all their university readings for each day. We would expect to start filling this attribute with integer counts for each day, but we can't — it's the wrong type! We wanted the templated integer type, but we got whatever the user had made — oops. The acquire endpoint gives us an explicit choice about what we want so we can prevent this.
On the other hand, let's imagine we're writing a client for updating manually entered attributes, whatever they are. We know the user has created an attribute called pages_read, and we don't care what type it is, because we just want to make a client interface for every manual attribute of any type. In this case, we'd acquire it with name, to make explicit that we're okay with non-templated attributes.
Releasing attributes
If we don't want to own an attribute any more, we can release it too. This will give up ownership to another service the user has connected that can fill it, or otherwise disable the attribute. The release call looks just like acquiring, except we send our array of JSON objects to https://exist.io/api/2/attributes/release/.
Creating a new attribute
Okay, so we can acquire attributes that already exist, or that are templated but the user doesn't have yet (because these will be automatically created). But what if we want to invent something totally new that isn't in Exist's list of templates? In this case, we'll need to create a new attribute. We can do this by making a call to the create endpoint and passing it some details about the attribute — things like its label, the type of data it holds, and which group it should belong to.
For Greatreads, let's say we already have a way to track the user's time spent reading via their e-book reader, so we'd like to sync that data to Exist via an attribute called something like "time reading". It should be a "duration" type and belong to the Media group. Because we have a media_write scope, we have permission to create new attributes in this group. We don't want it to be manually tracked by the user, because we'll sync this data automatically, so we'll pass manual as false.
For this call, we'll post an array of JSON objects to https://exist.io/api/2/attributes/create/.
from enum import IntEnum
from pprint import PrettyPrinter
import requests, json

TOKEN = '[your_token]'

# let's make some constants to represent Exist's value types
class ValueType(IntEnum):
    QUANTITY = 0
    DECIMAL = 1
    STRING = 2
    DURATION = 3
    TIMEOFDAY = 4
    PERCENTAGE = 5
    BOOLEAN = 7
    SCALE = 8

def create_attribute(token, label, value_type, group, manual):
    # make the json string to send to Exist
    body = json.dumps([
        {'label': label,
         'value_type': value_type,
         'group': group,
         'manual': manual
        }])

    # make the POST request, sending the json as the POST body
    # we need a content-type header so Exist knows it's json
    response = requests.post("https://exist.io/api/2/attributes/create/",
        data=body,
        headers={'Authorization':f'Bearer {token}',
                 'Content-type':'application/json'})

    if response.status_code == 200:
        # a 200 status code indicates a successful outcome
        # let's get out the full version of our attribute
        data = response.json()
        obj = data['success'][0]
        print("Created successfully:")
        # and let's print it (nicely) so we can see its fields
        pp = PrettyPrinter()
        pp.pprint(obj)
    else:
        # print the error if something went wrong
        data = response.json()
        print("Error:", data)

# call the function with the attribute details we're after
create_attribute(TOKEN, "Time reading", ValueType.DURATION, "media", False)
Save that script as create_attribute.py, insert your own token, and run it with python3 create_attribute.py. If all went well, you'll see the resulting attribute that was created:
{'group': 'media',
 'label': 'Time reading',
 'manual': False,
 'name': 'time_reading',
 'priority': 9,
 'value_type': 3}
The user now has this attribute in Exist, on the web Dashboard and mobile Progress tab! But for now it has no value for any day.
See that the name has been created for us as a "slugified" version of the label. The user won't see this name, but it's how we'll refer to the attribute in the API so it's useful that it's memorable.
Again, if we were to run the script a second time, we'd get an error that this attribute already exists. This prevents us from accidentally creating duplicates. And of course, again, we don't need to create the attribute each time we want to write to it. We can make a note of the fact that we've already created it for a user and from that point on, assume that it exists until we get an error.
Now that we have the name of our attribute, we can write to it.
Writing data
Each attribute has one value for each day, where this is a total or final value for the day. The default for writing data is also to send the total, which is easy if we already store or have easy access to that total. But for some apps, that won't make sense, and what they'd rather do is send an incremental update. For example, if you have a smart fridge (why) that fires an event each time you open the door (oh no), it would make sense to send a new 1 value to Exist each time, letting Exist do the hard work of tallying up a total number of times you've been looking for a snack. So Exist provides support for this flow too.
Let's start by looking at sending totals.
Writing totals
Let's say our example app, Greatreads, which owns the attribute pages_read, has its own internal value of pages read for a user for each day. It doesn't bother trying to keep this value up-to-date in Exist throughout each day, but is happy to call Exist every midnight to sync yesterday's total value.
We won't worry about simulating the local database aspect of Greatreads, and our script will just ask the user for a value and a date and send this to Exist. We'll POST these as an array of JSON objects to https://exist.io/api/2/attributes/update/. If we had many attributes, or many dates to update, we could add to our array and send these all at once.
import requests, json

TOKEN = '[your_token]'

def make_update(attribute, date, value):
    return {'name': attribute, 'date': date, 'value': value}

def update_attributes(token, updates):
    # make the json string to send to Exist
    body = json.dumps(updates)

    # make the POST request, sending the json as the POST body
    # we need a content-type header so Exist knows it's json
    response = requests.post("https://exist.io/api/2/attributes/update/",
        data=body,
        headers={'Authorization':f'Bearer {token}',
                 'Content-type':'application/json'})

    if response.status_code == 200:
        # a 200 status code indicates a successful outcome
        print("Updated successfully.")
    else:
        # print the error if something went wrong
        data = response.json()
        print("Error:", data)

# when we run this script, execution will start here
print("UPDATE PAGES READ")
# ask for our inputs. date can stay as a string
date = input("Date (yyyy-mm-dd format): ")
# but we turn our returned value into an integer type
value = int(input("Value (integer): "))

# make an update object to send
update = make_update("pages_read", date, value)

# call the function with the array of updates we've made
update_attributes(TOKEN, [update])
Save this as update_attribute.py, add your access token, and run it with python3 update_attribute.py. We can now enter a date and a value:
And we should see this reflected on the Exist web dashboard and in the app immediately. We could run this again and enter another date and value, or even the same date and a new value, and this would be updated in Exist. Because we own pages_read, we're responsible for setting its daily values. These won't change unless we change them, or until the user selects a different service to provide pages_read data for their account.
Reacting to events with the increment endpoint
Let's say that Greatreads has been acquired by the maker of Spark e-readers, and the new parent company has announced a partnership with Hello Code, the hard-working and attractive makers of Exist, to provide more personal analytics data in real-time for owners of the premium Spark Mirage. Word has come down from management that we'll have to refactor our Greatreads client for Exist to send an update for pages_read each time the user turns the page.
Fortunately, this is easy. Instead of sending a total for pages_read to the attributes/update/ endpoint, we can send a 1 to attributes/increment/ endpoint, and call this whenever the page turn event is triggered. We don't even have to include the date if we're doing this in real-time, because the default date is always today.
import requests, json

TOKEN = '[your_token]'

def make_update(attribute, value):
    # this value is now the amount to increment by
    return {'name': attribute, 'value': value}

def increment_attributes(token, updates):
    # make the json string to send to Exist
    body = json.dumps(updates)

    # make the POST request, sending the json as the POST body
    # we need a content-type header so Exist knows it's json
    response = requests.post("https://exist.io/api/2/attributes/increment/",
        data=body,
        headers={'Authorization':f'Bearer {token}',
                 'Content-type':'application/json'})

    if response.status_code == 200:
        # a 200 status code indicates a successful outcome
        data = response.json()
        # get the current value from our success object
        current = data['success'][0]['current']
        print(f"Updated successfully. New value is {current}.")
    else:
        # print the error if something went wrong
        data = response.json()
        print("Error:", data)

# when we run this script, execution will start here
print("INCREMENT PAGES READ")

# make an update object to send
update = make_update("pages_read", 1)

# call the function with the array of updates we've made
increment_attributes(TOKEN, [update])
Save this as increment_attribute.py, add your access token, and run it with python3 increment_attribute.py. Now each time we run it, we can see the total for today incrementing:
$ python3 increment_attributes.py
INCREMENT PAGES READ
Updated successfully. New value is 27.
$ python3 increment_attributes.py
INCREMENT PAGES READ
Updated successfully. New value is 28.
So now we're able to react to events by sending the value of the change only, for example one page, rather than calculating the total. Management will be happy. The increment doesn't have to be 1, and can be used with decimals and duration types too.
This call is still bound by rate-limiting rules, though, so if we're reading pages too fast we should be mindful of running into a HTTP 429 error response, and our increment calls will fail until the limit resets.
And now that we've covered authenticating users, creating and acquiring attributes, and finally ways to write data, we've concluded our study of creating a write client for Exist! I hope you've found it a useful way to understand the process, because it took me a really long time to write.